From the Dashboard, select or one of the Returns which is already under process. To file the Regular Return, click on Regular Return from the main options menu (Dashboard), or the user can use the shortcut option for Regular Return directly from the dashboard, as displayed below: (Shortcut options can only be found in the dashboard only)
The following screen appears:
Company – Select the Company for which the return has to be filed..
Financial Year – Select the Financial Year for which the return has to be filed.
Quarter – Select the Quarter for which the return has to be filed.
Form no. – Select the Form No. for which the return has to be filed. In this case, Form 26Q is selected.
click on Proceed to go further, as shown below:
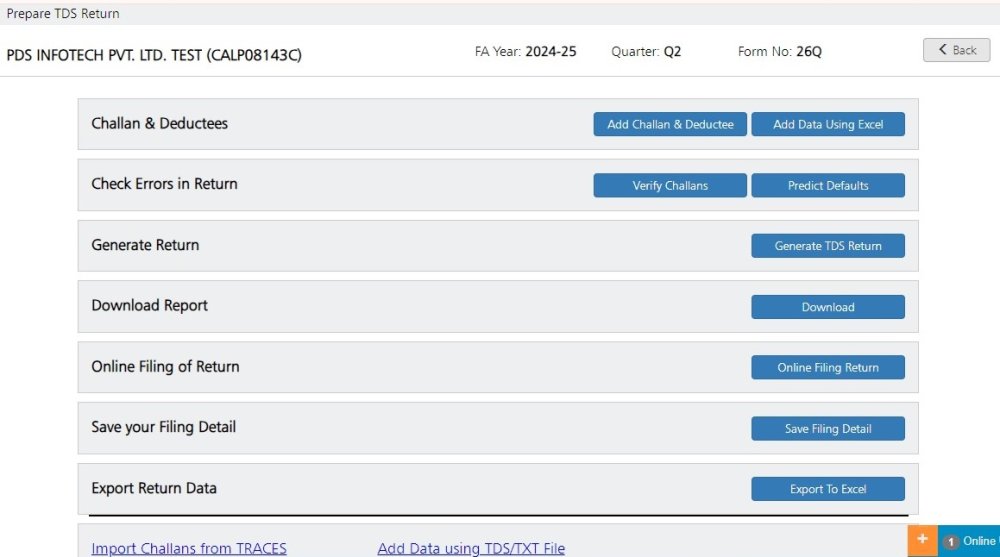
After proceeding, the above screen will appear. Here, we briefly explain the different steps that are involved in preparing and generating the return.
The screen will show 5 options as displayed above. These options are:
Step 1: Add / Modify Entries – in this option, the user can add new Challan details and deductee data. If the data is already given, the user can also modify the existing Challan & Deductee data in this step. There are two options provided under step 1. The options are:
• Add Challan & Deductee – The Challan details & the corresponding deductions are to be manually entered here.
• Add Data Using Excel – Apart from manual effort, this whole data can also be imported, through Excel Sheets, using this option.
Step 2: Check Errors in Return – Once the data is in place, it is a healthy practice to check for any possible error, which may lead to error notices from the IT department. Using ‘Predict Default’ option, the user can check for errors and defaults in the data.
Step 3: Generate return – By clicking on this option, the user can generate the TDS Return in electronic format, which has to be submitted to the IT department.
Step 4: Download Report – This option provides the detailed list of Challans & Deductees for the TDS return as per the manual format of the IT department. This can be printed for record-keeping purposes.
Step 5: Save your Filing Detail – Once the TDS return has been filed, one can update the filing information using this option. This would be useful in case of any correction is required to be made in the future.
Step 6: Online Filing of Return – Once the FVU file is ready, you have the option to file it online.
Step7: Online Challan Verification
- Verify Challan – All challans entered in Return, through this option, may be verified with the IT Department’s data.
- Import Challan – Instead of entering data manually or from the Excel Import, it may directly be imported from the IT Department.
Need more help with this?
TDSMAN Online - Support


